A GIF is a short looping animation or video clip that usually lasts just a fraction of a second. They’re made from a brief sequence of compressed images that keep the file small and easy to share. Like emojis on steroids, GIFs can steal your viewers’ hearts with a powerful emotional or creative punch in a tiny package.
Photoshop comes with an array of animation and image stacking tools that make creating GIFs simple and quick. You can start turning your ideas into animated GIFs today with our Adobe Photoshop download. This step-by-step tutorial will show you how to make a GIF in Photoshop.
Keep your GIF small with the right file settings
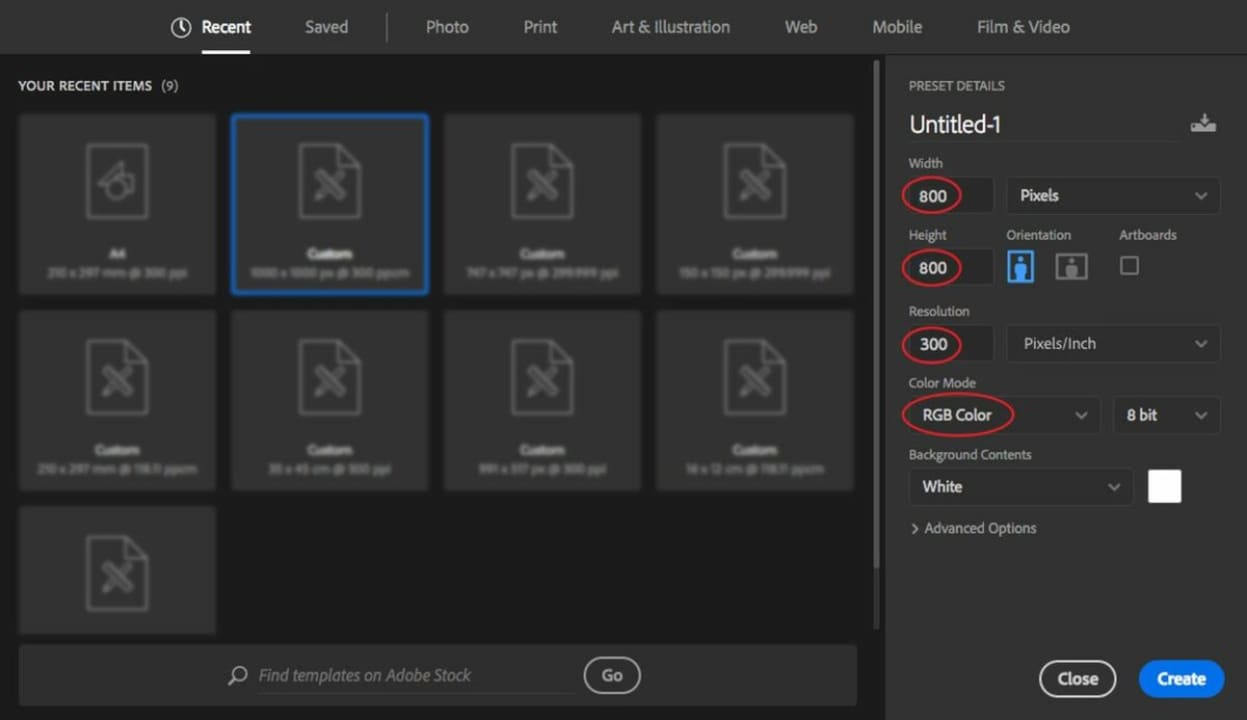
– Open Photoshop, and press Ctrl + n to open the Create a new document panel. There are a lot of preset details here, but you only need to focus on the size, resolution, and color settings.
– If you let the size of your still image or drawing dictate your GIF’s file size, your clip will probably be bigger than you need. Somewhere around 600 to 800 square pixels is usually big enough for most GIFs.
– To keep your GIF small yet clear, use a resolution somewhere around 150 to 300 pixels per inch.
– You’re not going to print your GIF, so set the Color Mode to RGB color.
– When you’re ready, click on the blue Create button at the bottom right.
Import your prepared frames
– The first frame of your animated GIF will be the first visible layer in your stack. All the consecutive layers under it will simulate the movement.
– If you want to work with still images or video that you’ve prepared beforehand, you’ll need to import them into your new Photoshop document. If you’ll be drawing your GIF from scratch, skip to the next section.
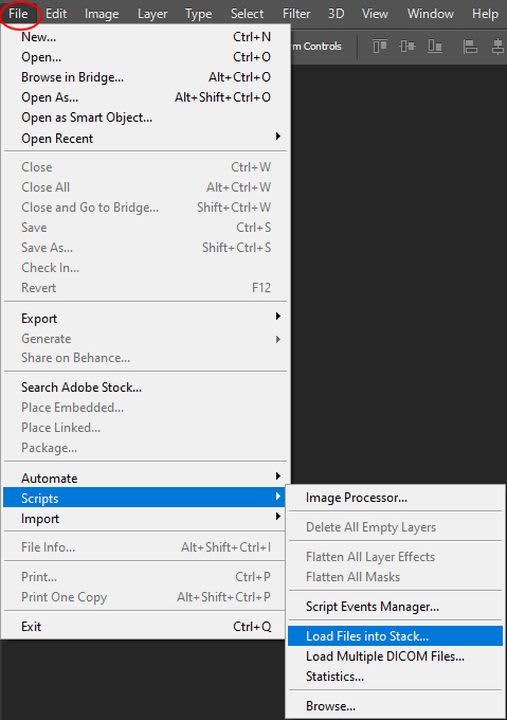
– To load a collection of still images into your new document, click on the File menu at the top left and then Scripts > Load Files into Stack.
– In the popup window, click on Browse, and then, find the images you want to use in your GIF.
– You can hold down the Shift key while you click to select multiple files. Select all the images you need, and click Open and then OK.
– The images you selected will be imported into sequential layers in a separate document. You can resize or tweak them so that they fit into the canvas size and resolution you chose for your GIF document. Once you’re satisfied, you can select them all in the Layers panel on the right and then drag them over to your GIF document.
Convert a video file
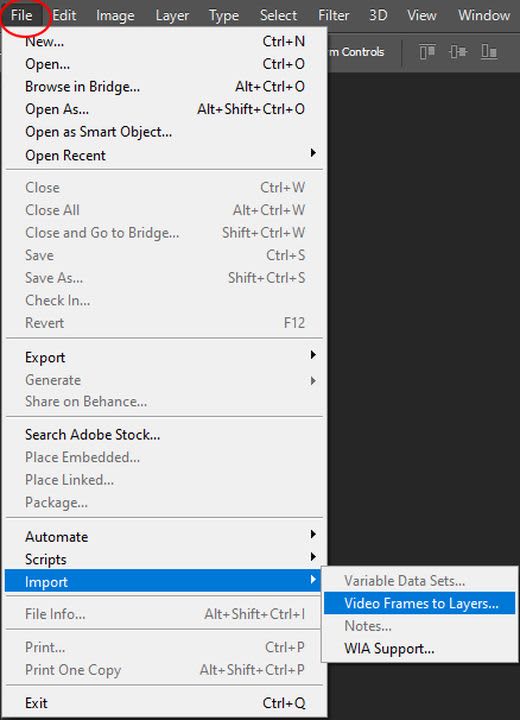
– To convert a video file into an animated GIF, click on File > Import > Video Frames to Layers.
– Make sure you only import short video clips, as Photoshop may have trouble importing long videos. The Import Video to Layers window gives you options to import the whole video, a Selected Range Only from your video file, or even just the frames at a set interval, like every other frame or every 10th frame.
– Click OK to start importing your video clip.
Create your animated GIF from scratch
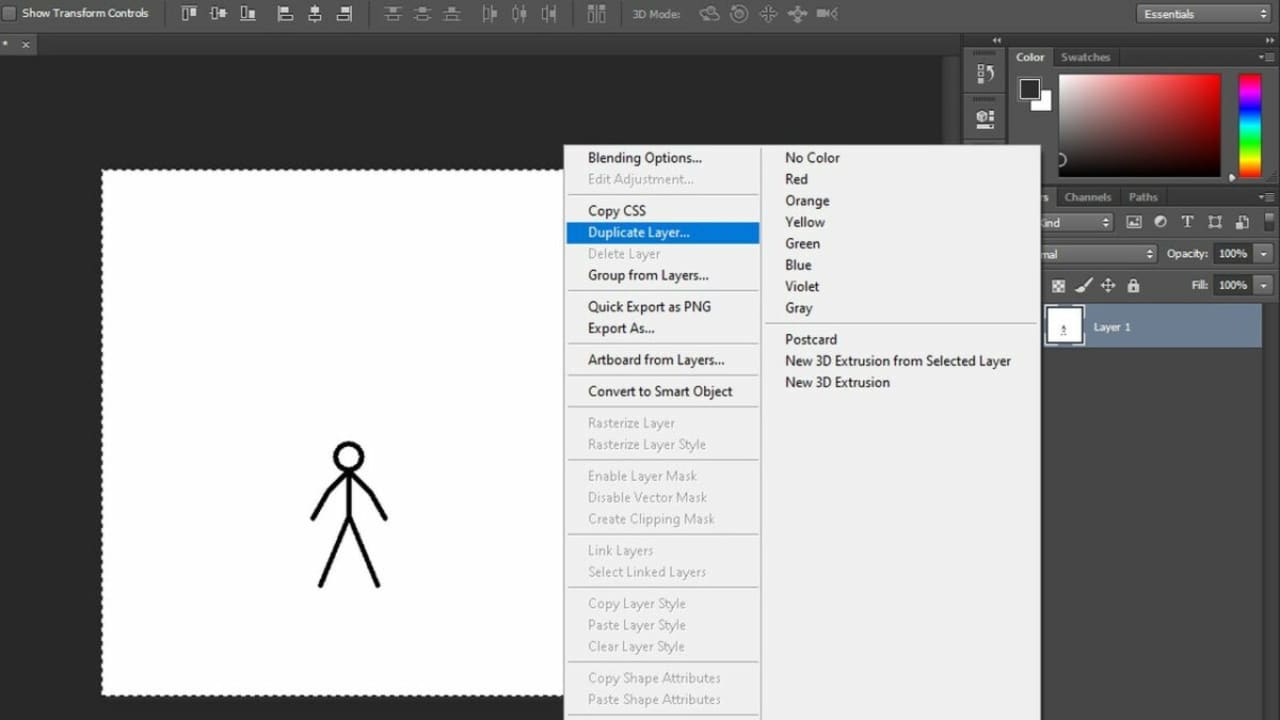
If you want to draw the animation yourself frame by frame, import or draw an image to use as your first frame. When you like what you see, duplicate that layer by right-clicking on it in the Layers panel and selecting Duplicate Layer.
– Select the duplicate layer you just created, and draw the changes you need for your next frame. Repeat as needed.
Convert your layers into GIF frames
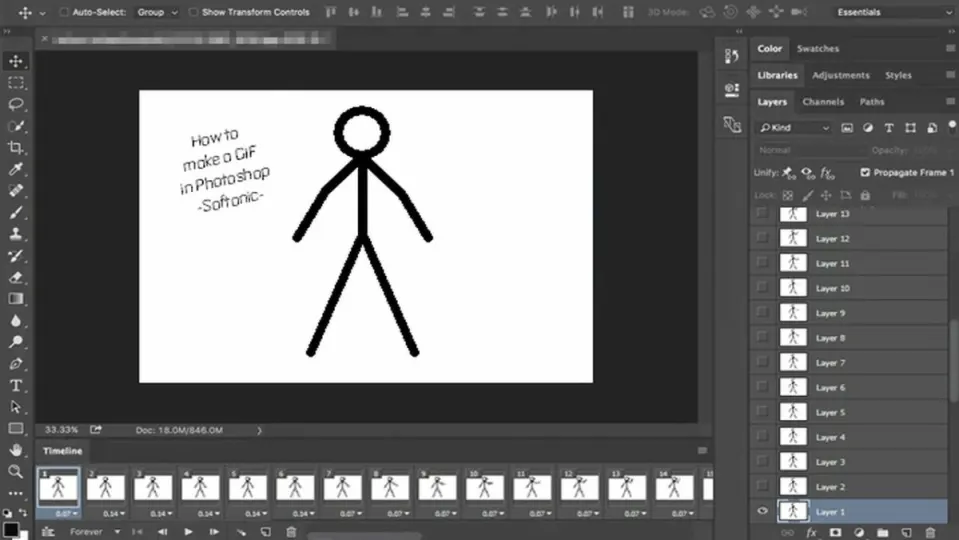
Now that you have your imported or drawn images stacked neatly into consecutive layers, turn them into frames. Click on Window from the top menu and then Timeline to open the Timeline panel at the bottom of your screen.
– Click on the dropdown arrow in the middle of the Timeline panel, and select Create Frame Animation.
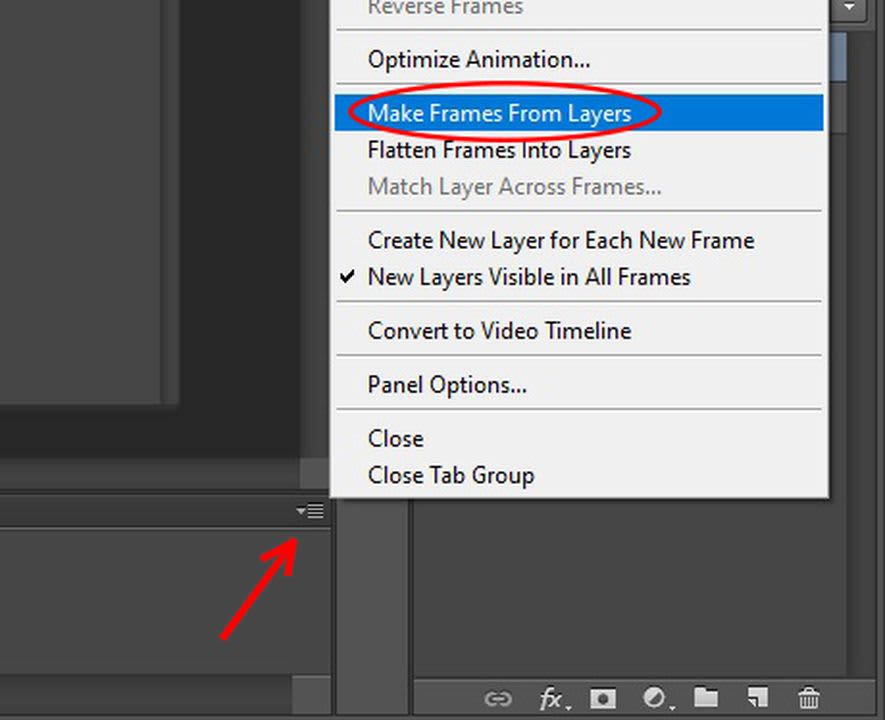
– Click on the Options icon at the top right of the Timeline panel. It looks like three parallel horizontal lines. From the dropdown menu that appears, select Make Frames from Layers. This will put each of your layers into a separate frame in your timeline.
Set your GIF’s timing
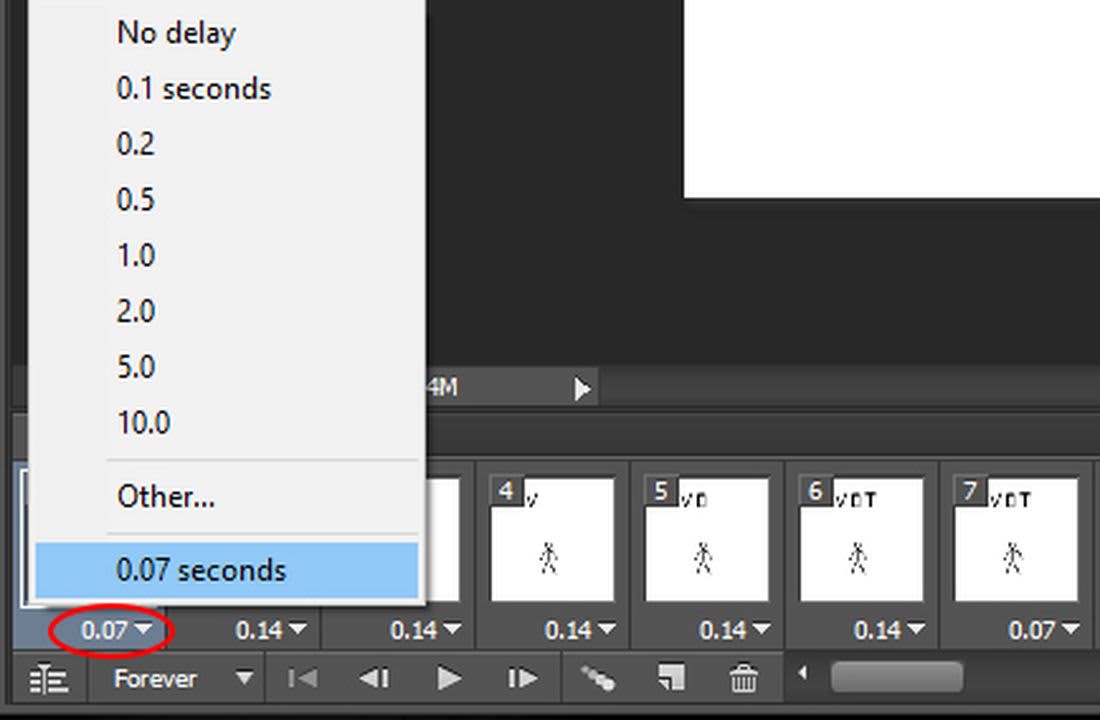
Under each frame in your timeline, you’ll see a decimal number expressing how many fractions of a second it should appear. You can change a frame’s timing by clicking the dropdown arrow next to the decimal number. You can also select multiple frames to change the timing of all of them at once.
If you want smooth, lifelike animation, use a lot of frames with short delays. Most creators use a frame delay of around 0.07 to 0.09 seconds.
At the bottom left of the Timeline panel, you can see the frame loop setting is set to Forever. This is good for most GIFs, but you can change it to loop once or a specified number of times by clicking the dropdown arrow.
Preview, save, and export your GIF
The sideways triangle at the bottom of the Timeline panel is the play button that lets you preview your animated GIF. Once everything looks good, press Ctrl + s to save your Photoshop document in case you need to make changes later.
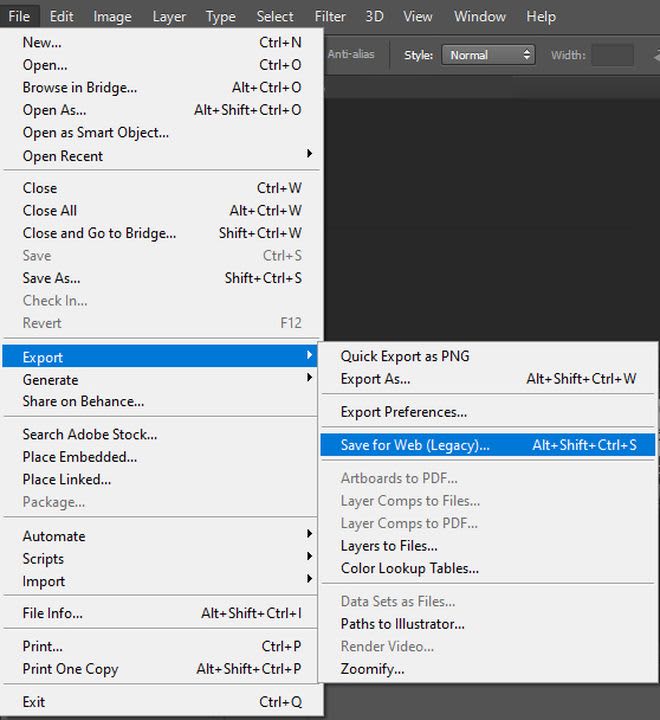
– To export the final version of your GIF, click on File > Export > Save for Web (Legacy).
– Just like in the Create a new document window, there are a lot of details you can ignore in the Export window.
– From the Preset dropdown menu on the top right, select GIF 128 Dithered.
– From the Colors dropdown menu below that, select 128 or 256 colors, depending on how small you need your file. You can see how big the exported file will be at the bottom left of the preview window.
– Click the Save button at the bottom of the screen to export your animated GIF.
Share your animated GIF with the world
Watch the GIF you just made by dragging the file into any web browser, or share the file with your friends on social media or your favorite messaging app. If you’d like to see a few of the other awesome things you can do in Photoshop, take a look at our in-depth review of the latest Adobe Photoshop updates.