How To
How to remove unwanted elements from an image in Photoshop
- April 11, 2022
- Updated: July 2, 2025 at 3:49 AM
So, you’ve taken a rare Corsican vacation. It’s magic hour. You just encountered the ideal marina setting for your last vacation photo. You ask a friendly passerby to snap the shot, just as the sun spills into the sea. An hour later, you upload the image to your laptop and notice a peculiar element in the distance. You sit deflated, realizing it’s a local photobombing your picture from his yacht.
Unwanted elements find their way into pictures all the time. Before desktop imaging, there were ways of recomposing photographs. But, generally speaking, consumer-level photographers lacked the tools to remove the undesired objects. When Photoshop launched in 1990, it revolutionized the way both amateurs and pros handled their images. Below, we show you how to remove unwanted objects with Photoshop to create beautiful pictures.
The Spot Healing Brush

The Spot Healing Brush, located beneath the Eyedropper, is the fastest and easiest approach to removing undesired elements from your images. The Spot Healing Brush works best when the unwanted object is set against a simple background, like the sky, and the element is relatively small. If you notice a seagull has crept into an otherwise clean background, the Spot Healing Brush is your go-to Photoshop tool. Here’s how to use the Spot Healing Brush:
– Your first step is to create a Duplicate Layer. To do this, right-click on the original image layer and choose Duplicate Layer before pressing OK. The Duplicate Layer lets you alter your image without modifying the original file. While Photoshop makes it easy to undo and redo any edits you do make, the Duplicate Layers ensure the preservation of your unaltered photo.
– Next, you can select the Spot Healing Brush, using the [ ] keys to change the size of your brush. Pick a brush size proportionate to the element you want to remove.
– Like painting, this tool requires a delicate touch. Carefully brush over the object until it disappears and there are no digital artifacts in your results.
– If you want to remove a large object requiring a large brush size, the Spot Healing Brush probably isn’t your best solution. We’ll discuss a more suitable alternative later, but it’s important to remember the Spot Healing Brush tool is best for removing image spots, not entire scene elements.
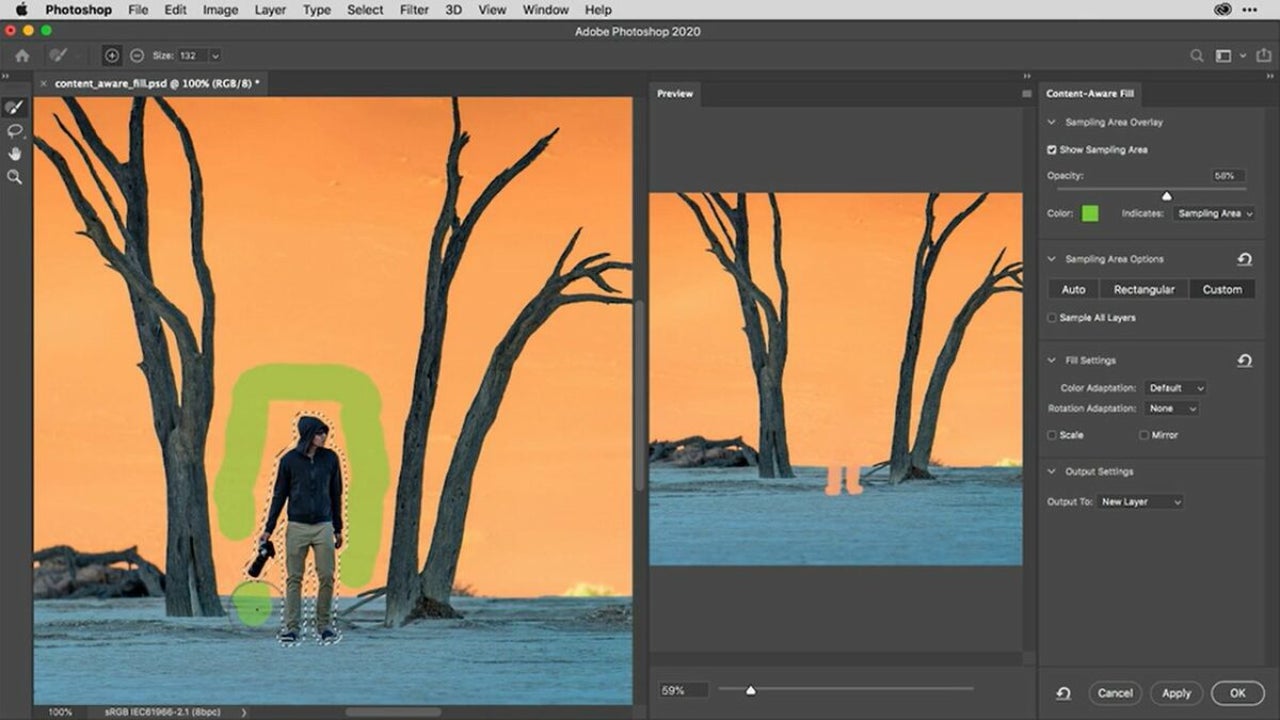
Content-Aware Fill for deleting objects with Photoshop
The Content-Aware Fill tool differs from the Spot Healing Brush in that it is more effective at removing large objects from a photographic scene. Photoshop excels at replacing pixels with consistent colors and textures, and the Spot Healing Brush is always a great tool for accomplishing this. But in more complex images, the application occasionally struggles, rendering unnatural-looking effects.
Photoshop’s new Content-Aware Fill workspace gives you more control over your images. The tool provides more flexibility in how you replace pixels. With the Content Aware-Fill workspace, you can select and remove elements entirely or shift and integrate them into another image space entirely. Photoshop then uses machine-learning to identify the hole you left behind, filling it in with a highly accurate patch.
– To start, create a new Duplicate Layer following the same steps outlined above. This preserves the integrity of the original file if you make a mistake.
– Next, select the element in the scene you want to remove using the Quick Selection Tool. Like the Spot Healing Brush, the [ ] keys let you control the brush size.
– To add scene elements to the selection, type Shift + Click simultaneously. Alt + Click allows you to remove unwanted selections.
– If you’re dealing with complex shapes that are difficult to differentiate from the background, use the Lasso Tool to help with selecting your object. You’ll freehand trace around the element.
– Holding down Alt lets you remove portions of the auto-selected object so you can trace around it. Pressing Shift allows you to add to the selection. The tool will still help guide you and doesn’t require ultra-precise strokes to the point where you need a professional drawing tablet.
– After you’ve made your selection, find Edit in the menu bar and choose Content-Aware Fill. You’ll see a preview inside the tool that displays how the image will look without altering the file.
– If the results look good, click OK. The new fill generates itself in another Duplicate Layer, and you can use the Spot Healing Brush to touch up any areas that didn’t blend perfectly.
Getting the most out of Photoshop
Photoshop offers several more alternatives for removing objects from your images. Using the Spot Healing Brush and the AI-based Content-Aware Fill tool account for the two most popular methods. Photoshop’s Content-Aware workspace has improved considerably in recent years. To learn more about editing and recomposing your personal photos, consider checking advanced Photoshop tutorials.

You may also like
 News
NewsIt is one of the best sagas in the history of comedy, but it will never have a third part
Read more
 News
News'Trigun' will have a new sequel, and its trailer is spectacular
Read more
 News
NewsTaylor Swift is going to return to the cinema again, but not as an actress
Read more
 News
NewsThe new trailer for season 4 of 'Bridgerton' reveals the most important thing: its release date
Read more
 News
News'The KPop Warriors' will never have a live-action version (or so says their director)
Read more
 News
NewsIt's one of the best Marvel series, but it's not canon… at least for now
Read more