How To
Adobe Photoshop guide for beginners
- May 14, 2018
- Updated: July 2, 2025 at 6:30 AM
Adobe Photoshop is one of the most advanced image post-processing tools available. If you are a photographer or aspiring to be one, you’ve probably heard about Photoshop before. The term ‘photoshopping’ has become synonymous with referring to edited photos and images, so much so that even people unfamiliar with the program are using the term.
However, anyone who’s ever worked in Photoshop will tell you that it is overwhelming the first time you open the program. Since the software is so robust and powerful, there are a lot of tools and menus on the main screen. However, with a bit of guidance, you’ll soon find that this photo editor is quite simple to use. Let’s show you our detailed Photoshop guide for beginners.
What Is Adobe Photoshop?
Photoshop is one of Adobe’s oldest and most popular programs. It was first released in 1990, and since then, it has become the industry standard in raster graphics editing and digital arts. Photoshop is a raster graphics editor that is used to edit and enhance photos and images.
Photoshop is often the editing software of choice among photographers because of the vast range of tools. It is available on Windows and Mac computers and can integrate with other Adobe programs such as Adobe Lightroom.
How much is Photoshop?
Photoshop is not a free program, and you will have to get a subscription to use it. If you want just Adobe Photoshop, you are looking at $24.14/month. However, Adobe also has a promotional photography plan that includes Photoshop and Lightroom for $11.49/month. Alternatively, you can also subscribe to the Creative Cloud for $34.49/month, which gives you access to 20 programs, including Photoshop, Lightroom, After Effects, Premiere and more.
What Is Photoshop CC?
This is the full version of Adobe Photoshop that you get when paying a subscription. During this article, we will be discussing Adobe Photoshop CC.
What Is Photoshop Elements?
Photoshop Elements is a simplified version of Photoshop that can be used for quick photo editing. It does not have all of Photoshop’s features, which means there are some limitations, but it is still a pretty powerful photo editor. The latest version, Adobe Photoshop Elements 2022, has been released, and there is a once-off fee of $99.99 to use it. Like its predecessor, Photoshop Elements is available on Windows and Mac computers.
What Is Photoshop Express?
Adobe Photoshop Express is the free app version of Photoshop that is available on Android and iOS devices. This app is not as full-featured as Photoshop CC but still contains enough tools for some basic photo editing while on the go.
What Is Photoshop Used For?
Photoshop is most commonly used to edit photos and images. However, it is not only limited to these actions. Being such a robust program with many different features means that it is also used for digital painting, graphic design, web design, creating GIFs and editing photos for videos.
Features of Photoshop
As we’ve mentioned, Photoshop has many valuable features that can be used to edit, create and manipulate images and photos. Here is just a small sampling of some of Photoshop’s features:
- Adjusting hue and saturation
- Working in layers
- Adjust the color balance and tonal range with levels
- Creating adjustment layers
- Color channels palette
- Applying filters
- Sharpening images
How to Use Photoshop?
Photoshop can be a complex yet powerful tool capable of many different image editing, manipulation and improvement tasks. In this beginners guide, we’ll only be covering a few of the basics of using Photoshop. There is much more than you can do with the program, but this is an excellent place to start. Once you’ve mastered the basics, many more guides and tutorials can help you with more advanced Photoshop practices.
It is also important to remember that Photoshop was built as more than just a photo-editing platform. It also contains features that are more relevant to illustrators, graphic designers and art directors. And while photographers rarely use these features, they still have their place, so it’s a good idea to learn a bit about them and keep the knowledge in your back pocket for that special project where you may need some more advanced techniques.
The Basics of Photoshop
Before starting with the basics of using Photoshop, it is essential to understand the program’s layout first. This way, you’ll know where to look for specific tools, features or settings. Photoshop is divided into several different work areas. Each of these areas offers different ways that you can edit or manipulate a photo or image.
Navigation
Let’s begin with some of the basic areas and what you’ll find.
Menu
The menu bar can be found at the top of your screen. Here you will see different commands for a wide range of tasks, from opening a new project to saving one you are busy with. From this menu, you can also rotate images and photos or add special effect filters. This menu is the primary control panel for Photoshop.

Tools
Your tool panel contains all the powerful tools you may need to adjust, edit and manipulate images. Think of it as a handyman’s toolbox, but for a photographer editing photos. You can use functions such as the paintbrush or pen from this toolbox, which can be used for touch-ups or more intricate design work.
You’ll also have access to the magic wand and lasso tools from this toolbox. These functions will allow you to isolate specific areas of a photo or image for editing without altering the rest. You’ll also find the shape and text tools here, which you can use to add text or shapes to your images. Finally, there is also an eraser, healing and clone stamp tools that can remove imperfections.

It’s important to note that some tools, like the lasso, have different variations. Each variation is designed for a different aspect of photo editing. If you click on a tool with additional functions such as the lasso, you will see a drop-down menu that displays the different options.

Tip: Unsure of what a specific tool does? It can sometimes be difficult to know from the icons what each tool does. However, by hovering over the icon, a text pop-up will show what it is.
Options
Right beneath the menu bar at the top of the screen, you will see the options bar. This bar will allow you to change the settings and parameters of any tool that you are currently using. For example, after choosing the Paintbrush tool from the tools menu, you will see different options appear in the options menu that will let you change the size of the brush, shape of the brush or opacity of the brush strokes.

Floating Panels
In addition to the above panels, which are permanent, there are also floating panels that appear when you select specific commands from the menu. These floating panels can be moved to any position on the screen, or they can be closed if you aren’t using them. Some of these floating panels include ones for editing color, contrast and layers. You can open any of these floating panels by clicking on the ‘Window’ tab on the menu bar.
Getting Started
Now, let’s get started with how to use Photoshop.
Opening a File
The first thing you will need to do before getting started is open a file in Photoshop that you want to edit. There are two main ways that you can open a file in Photoshop. You can drag and drop the file you want to edit onto the Photoshop icon on your computer’s menu bar. Alternatively, you can open Photoshop and click on ‘File’ in the menu and then ‘Open’.

Zooming
You may want to zoom in or out of a specific image so that you can make more precise edits. To do this, you can click on the zoom function from the tools menu. A magnifying glass icon will represent it. If you prefer using keyboard shortcuts to zoom, you can press Cmd+ or Cmd- to zoom in and out of your image.

Once you’ve zoomed in and out of the image, you can use the hand tool (also in the tools menu, represented by a hand icon) to pan left, right, up and down.
Saving
To save files in Photoshop is similar to most other programs. You can click on ‘File’ in the menu and select either ‘Save’ or ‘Save As’ from the drop-down menu. If you choose ‘Save’, it will save this image over the current copy you have. By selecting ‘Save As,’ you will save it as another copy of the image and will have the chance to rename the files and choose the location where you want to save the image. Alternatively, you can also use the keyboard shortcut Ctrl+S (Windows) and Cmd+S (Mac).

You can continue saving an image as a JPEG file unless you add a layer. Once you start adding layers to JPEGs, they will need to be saved in a PSD or TIFF format.
Cropping and Straightening
Cropping or straightening a photo or image does cause some loss of image quality. This is why we recommend that you shoot your photos with the exact composition you want to avoid using these tools too often and losing image quality.

Sometimes cropping or straightening a photo is unavoidable. To crop a photo, you select the ‘Crop’ tool from the tools menu. A ‘crop’ border will appear around your image so that you can adjust it to only select the area you want. You can drag the edges or corners of the border until you get the desired shape of the photo you want. Once you’re happy with the image, you can press Enter (Windows) or Return (Mac) to complete the process and finalize your cropping.
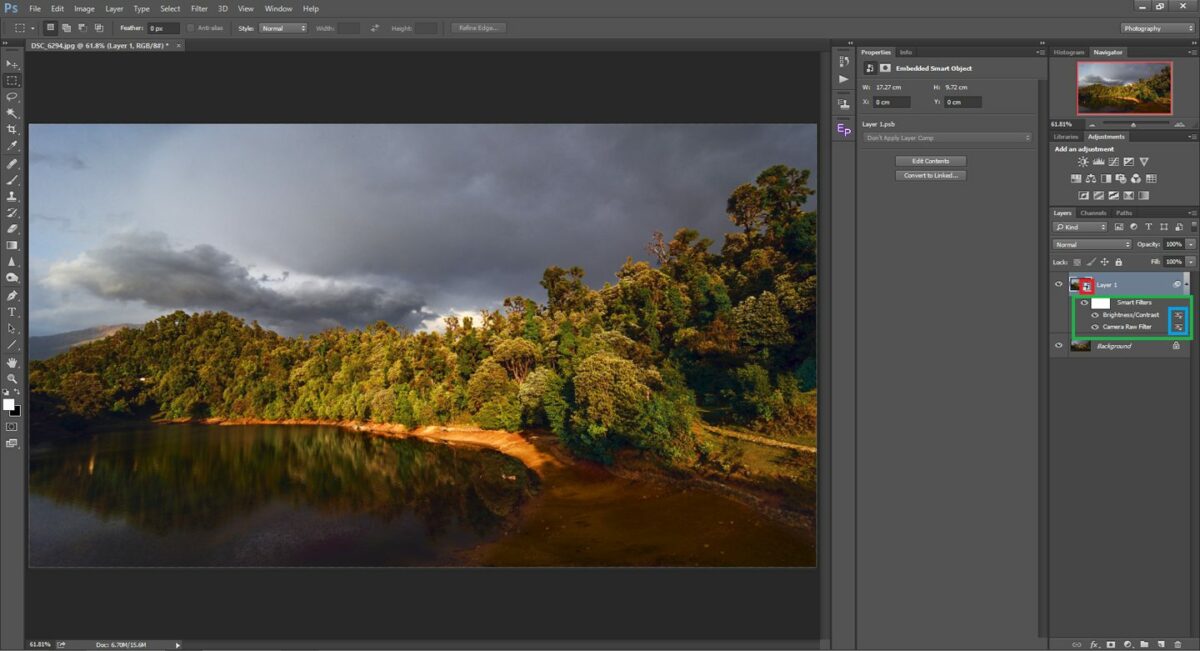
Brightness/Contrast
Adjusting the brightness or contrast of a photo can sometimes be a simple and effective way of improving a photo. Adjusting the contrast and brightness of an image during the editing stage can change the look and atmosphere of your photo and can sometimes help to unlock its full potential.

To adjust the brightness or contrast of your photos, you can click on ‘Image’ in the menu bar. Then select ‘Adjustment’ and ‘Brightness/Contrast’. You will see a new adjustment panel appear on your screen. In this panel, you can adjust the appropriate slider to change the contrast and brightness.

Color
Once you are happy with the contrast and brightness of your photo, you can start looking at the colors. This is another critical step in editing photos. Several different tools in Photoshop let you adjust and change colors in your images. Let’s look at some of the essential color tools next.
Color Balance
The Color Balance Panel will be your best friend when it comes to adjusting colors in an image. To get to this panel, you will need to click on ‘Image’ in the menu and then ‘Adjustment’ and ‘Color Balance’. The color balance panel will have sliders that allow you to adjust the Cyan/Red, Magenta/Green and Yellow/Blue color balance in your image.

You will also see buttons for Shadows, Midtones and Highlights in the panel. By clicking on these, it will allow you to adjust the color balance for those sections only. By adjusting these areas separately, you can make the elements of your image stand out.

Before making any of these changes permanent, you will get an option to preview the image. You will be shown a side-by-side of the original image and one with your changes during the preview. If you are happy, you can press Enter (Windows) or Return (Mac) to make the changes permanent.
Hue/Saturation
To adjust the hue and saturation of your images, you click on ‘Image’ in the menu. Then you can select ‘Adjustments’ and ‘Hue/Saturation. This will open a new panel to adjust these settings.

Saturation
By increasing the saturation of your photos, it will make the color stronger and more vibrant. This will give the image more impact and help it stand out. However, if you are going for a more somber and serious look, you may want to decrease the saturation. Which way you adjust the slider depends on the type of photo you’re editing and the mood you want to invoke.

Lightness
As the name suggests, this slider can increase or decrease the light (or brightness) of colors in your photos. It can also be used to desaturate colors. Using the lightness and saturation tools together can often give you the precise result you are looking for better than only using one of them.
Hue
You probably won’t be using this function quite as often as Saturation and Lightness, but it can be a useful tool in certain editing instances. Adjusting the hue slider will change the overall color of your photo, not just certain parts. It can be used to drastically change the mood of a photo but should be used with caution.
One Color at a Time
Sometimes you may be tempted to change all the colors in your photo with the functions mentioned above. However, in some instances, it may not be necessary and can appear too extreme. You can also only choose to make adjustments to a single color, for example, red, without altering the other colors in your photo.

To do this you can navigate to the drop-down menu at the top left of the Hue/Saturation panel and select only the color (reds or the blues, or yellows, or whichever color you want). Now any changes that you make to either the Saturation, Lightness or Hue sliders will only affect the color you’ve chosen, rather than all of the image.
Image size and resolution
Now that you’ve completed the basic editing of your photos and you have them looking good, it’s time to save them. You will need to save your photos at an appropriate size and resolution so that they can be used later on. The size and resolution you choose will depend on what you want to do with the photos. For example, if you want to upload these images to social media, you will need to drop the dimensions and resolutions.

Image Size
The image size is the physical dimensions of the image measured in pixels when used online and cm/inches when printed. This is not the same as file size, which is measured in KB, MB or GB, although the two are directly linked. For example, a larger image size will lead to larger file size.

To resize your photo, first click on ‘Image’ in the top menu. Then select ‘Image Size’. Keep the link icon highlighted so that when you adjust the height of the image, Photoshop will automatically adjust the width by the same degree. Once done, click on ‘Resample’ to reduce the number of pixels in the picture, which will reduce the image size.
Resolution
Resolution refers to the dots per inch (DPI) an image contains when printed. The DPI will determine the quality of the print, ie. Low DPI means fewer dots spread over the print, leading to a grainy or pixelated image. High DPI means more dots spaced closer together for a more realistic and clean image.
To change the resolution of your photo, click on ‘Image’ once more in the menu. Then select ‘Image Size’. In the panel, deselect ‘Resample’ to preserve the original number of pixels. If you are going to print your images, set the number of pixels per inch in the ‘Resolutions’ field to 300. This automatically changes the width and height fields correspondingly.
Tip: If you have to reduce the image size and/or resolution, make sure to save a high-quality copy first so that you have one available and then reduce the image size and then save it as a separate image.
Photoshop: tips and tricks for beginners
In this guide for beginners, we’ve covered the basics of Photoshop. However, if you want some useful tips, here are a few more helpful guides.
- How to add an image to a layer
- How to merge layers
- How to edit Photoshop background
- How to blur the background of an image
- How to fix Adobe Photoshop Error 16
- How to get Adobe Photoshop
- 4 Tips on editing your background
- 3 Tips to resize images
- Best free online courses and tutorials to learn Photoshop
- How to add fonts to Adobe Photoshop
- Pro Photoshop tips for everyone
- How to add snow to your photo
- How to install plugins in Photoshop
- How to create panoramic photos in Photoshop
- How to apply a color-cut effect in Photoshop
Unleash your creative side!
Armed with the above guide, you are ready to start using Photoshop and master the basic skills. Once you get used to working in Photoshop, you can start using more advanced features and really improve your editing skills.

Latest from Leri Koen
You may also like
 News
NewsThe new Predator movie is a box office success, exceeding expectations for its global debut
Read more
 News
NewsThis Polish modder is creating a version of The Witcher 3 that can rival the upcoming The Witcher
Read more
 News
NewsThe best Monty Python movie is back on streaming services to make us laugh like crazy
Read more
 News
NewsThis Turkish movie promises to be the next big action film that will blow up
Read more
 News
NewsDivided Hollywood: AI yes or AI no? This creative says, with his new series, that no
Read more
 News
NewsThe movie theaters are recovering after a few disastrous months with Russell Crowe leading the recovery
Read more