How To
How to Add Text in Adobe Photoshop in 4 Fast Steps
- May 26, 2021
- Updated: July 2, 2025 at 4:05 AM
What is Photoshop? You’re not the only one who’s wondered about this. Photoshop is a very comprehensive photo and image editing tool for Windows and Mac computers. Many professional and beginner photographers use Photoshop to edit and adjust their photos after they’ve been taken.
Photoshop is part of Adobe’s range of products known as the Creative Cloud, and to use these products, you will have to buy a subscription. However, the features and tools included in these programs are well worth the price to use the software.
With Photoshop, you don’t only have the essential editing tools, like with some free options. You can also add layers to images, blur the background, and even create panoramic photos.
Another useful feature of Photoshop is adding and manipulating text to make your images even more striking or add context. Let’s take a look at how to add text to your photos in Photoshop.
How to Add Text to Images in Photoshop
Adding text in Photoshop is one of the more basic features to use. However, this does not mean it is limited in any way. There are many ways that you can adjust and manipulate the text to match the mood and feeling of your image.
Open Photoshop and Import the Image
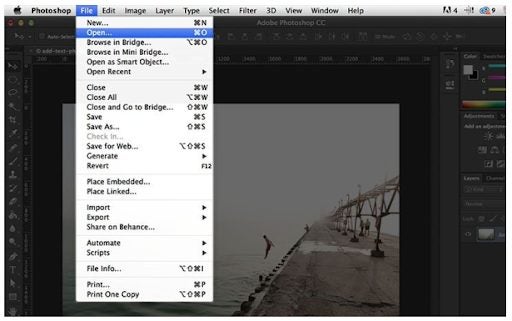
First, you need to launch Photoshop and then import the image you want to add text to. To import the image, you can click on ‘File’ in the main menu and then select ‘Open’ to select a photo you’ve worked on or ‘Import’ to select a new project.
Select the Text Tool
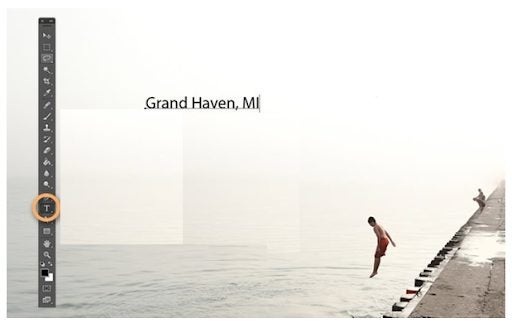
Now you can select the text tool from the tools panel at the left of your screen. The text tool is represented by a capital ‘T’ icon. With the tool selected, you can add text anywhere in the image that you click. You can also use the keyboard shortcut by pressing ‘T’ to select the tool.
Set Your Text Settings
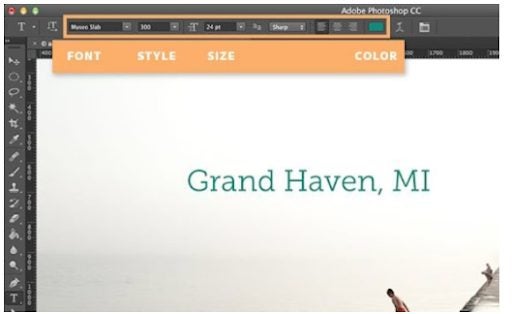
With the text tool selected, a new options menu will appear below your usual menu. Here you can adjust the different settings for your text. From here, you can easily adjust the font, font size, alignment and font color. If you want to use a font that is not included in Photoshop, you can upload new fonts.
Click on Your Image to Start Adding Text
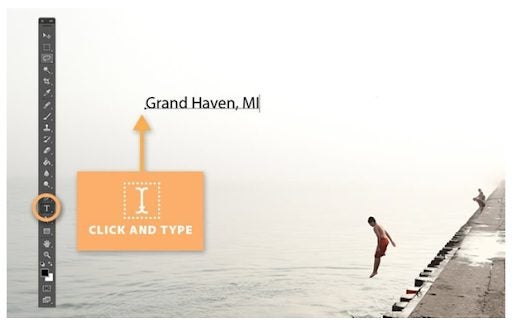
Now you’re ready to start adding the text to your image. To do this, you simply click where you want to start adding text. Don’t worry if it’s not in the exact spot as you will be able to move the text if needed. You will see a cursor appear after clicking. This is where the first word will appear. You can now start typing your text with the keyboard.
How to Use More Advanced Text Techniques
There are also a few more advanced text techniques you may want to use in Photoshop.
Click and Hold the Text Icon for More Text Options
By clicking and holding the text button in your toolbox, you will see a list with more options appear. These options include horizontal and vertical type tools that change the direction of your text, as well as horizontal and vertical text masking tools.
Use the Paragraph and Character Menus to Change Line Spacing and More
For complete control over your text, you need to open the Paragraph and Character panels. To do this, you click on ‘Window’ in the menu and then select ‘Character’ and ‘Paragraph.’ With these panels open, you can change the line spacing, kerning and more.
Use Text Blending for Professional Effects
If you’re looking for more professional effects for your text, you can right-click on your text. Then in the drop-down menu, select ‘Blending Options. This will give you access to more text effects such as bevel and emboss, stroke, overlay and drop-shadows.
More Photoshop Text Tips
Here are a few more text tips that you can use in Photoshop.
- To move your text, you’ll have to select the move tool from your toolbox. Then you can click on the text and drag it to the correct position.
- By clicking and dragging a text box, you will create an area for your text to appear in. Your text will only stay in this area, and any text that is too big to fit the space will be cut off, and you’ll have to adjust the font size to see all the text.
- If you cannot see the blending options after right-clicking on your text, you can try selecting ‘Layer Style’ first and then clicking on ‘Blending Options.
- You can also edit text layers. To do this, you have to double click on the layer icon found in the ‘Layers’ panel. Once you’ve selected the layer, you can start editing the text, changing the size of the text box or choosing a new font or alignment.
More Helpful Guides for Photoshop
If you need some extra help with Photoshop, here are a few more helpful guides to get you started:
- How to merge layers
- How to fix error 16
- How to get Photoshop
- Top tips for resizing images
- How to crop images
- Free online tutorials and courses
- Guide for beginners
- Pro Photoshop tips
- How to add snow to photos
- How to apply a color cut-out effect
The text field is yours!
Sometimes as designers, photographers and artists, it is necessary to add text to your photos and images. With Photoshop, this is simple enough to do, and you have a range of text options available to make the text professional and striking.

Latest from Leri Koen
You may also like
 News
NewsThey promised us season 2 of one of the best series of the last five years. Sadly, it may never arrive
Read more
 News
News'Wizards of Waverly Place' came to Disney by chance. Almost 20 years later, it still has new episodes
Read more
 Article
This Netflix action movie will feature the perfect tandem of actors: Ben Affleck and Matt Damon
Read more
 Article
The dark romance between Hermione and Draco that will hit the big screen
Read more
 News
NewsWe can now see the trailer for Alberto Vázquez's new animated movie
Read more
 Article
Ricky Gervais' new project is a series for Netflix, but with a twist you don't expect
Read more